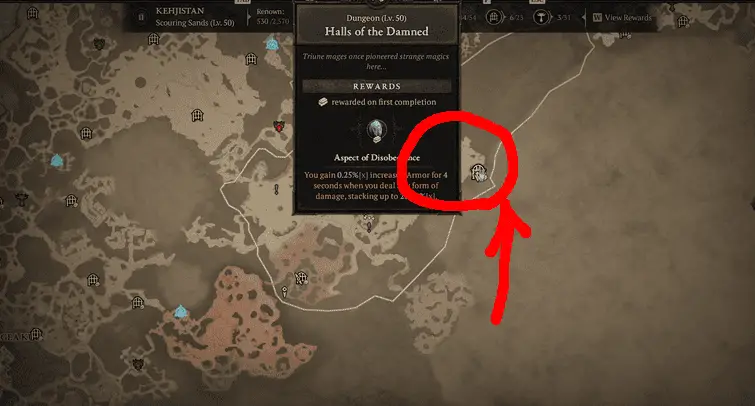
In Halls of the Damned, be cautious of the slow-opening doors, especially if you plan to lure monsters without engaging them, as the narrow passages can lead to you being overwhelmed.
Initially, your main objective is to locate and destroy two key structures: the Idol of the Overseer and the Seaborn Goddess.
Access to these structures is via scattered teleporters, but activating them will attract monsters, so clear the area first. The Idol attacks with varying projectiles, while the Seaborn Goddess uses wave attacks to push you away; both summon powerful monsters when their health drops.
Location
The Halls of the Damned is in the Scouring Sands subregion of Kehjistan, specifically to the northeast of Gea Kul. The most straightforward way to reach this dungeon is by using the Tarsarak waypoint and then heading northeast.

Objectives in Halls of the Damned
- Destroy the Idol of the Overseer and the Seaborn Goddess: These are two key structures you need to demolish to progress in the dungeon.
- Travel to the Sepulchrum: This is another area within the dungeon where you'll have additional objectives.
- Activate the Monolith: This is a lever or a switch that will either open a new area or trigger an event.
- Defeat the Tomb Lord: The final boss of the dungeon, known for being fragile but dangerous if not handled carefully.
How to Defeat the Tomb Lord
The Tomb Lord is the boss monster of the Halls of the Damned. While the boss is relatively fragile, players need to focus on being cautious of two main abilities:
- Blinding AoE: This area of effect damages players who stand in it for too long. It's advisable to avoid these areas.
- Bone Walls: The Tomb Lord can summon bone walls that have the potential to explode. If you find yourself too close to these walls, you risk taking significant damage. Use abilities to reposition yourself or destroy the walls to create an escape route.
Rewards (Aspect of Disobedience)
The Aspect of Disobedience gives you an increased armor of [0.25 - 0.50]% for 4 seconds whenever you deal any form of damage. This armor boost can stack up to [15.00 - 30.00]%, providing a significant increase in your defensive capabilities.
You can equip it on Helms, Chest Armor, Pants, and Shields. Additionally, when equipped on an Amulet, its power is increased by 50%, making it an exceptionally potent defensive tool. It's great for builds that focus on rapid, multiple hits, as you can quickly maximize the armor stack.